Just 10 years ago, a majority of users were surfing the internet on their PC. Today, according to statistics, most visits come from mobile versions of a website or mobile applications. Therefore, the requirements for the stability and quality of these applications are very high.
Usually, the quality of the software being developed is monitored by the testers. They write test cases, do manual testing and report bugs. However, for applications in active development, there might be several boring, repetitive and monotonous tests. That kind of work has a high risk of human error. How can this problem be solved?
Test automation
The answer is test automation. Entrust the more complex and critical tasks that will be difficult for the computer to handle to your QA, and let the routine work be done by the machine.
Let’s imagine you have decided to automate tests for your mobile app. What’s next?
First, you need to determine the technologies you are going to use for the tests. There are a lot of different frameworks for testing on the market. I would recommend these two: SpecFlow and Appium.
SpecFlow

SpecFlow – BDD framework
SpecFlow is an open source framework for behaviour-driven development (BDD). It allows you to write human-readable scenarios for your tests, which can also be your living documentation. SpecFlow integrates with Visual Studio.
Appium

Mobile app automation framework
Appium is a test automation framework for use with mobile apps. It allows you to test native, hybrid and mobile web apps. It uses the WebDriver protocol for iOS, Android and Windows apps.
Creating a simple test automation project
Let’s take a closer look at these frameworks and create a simple project for testing Android applications.
* We will assume that you have already installed Appium and the Android SDK. You can read about the Appium setup here and the Android SDK here.
Open Visual Studio and create a new C# class library project. Call it “Mobile.UI.Tests.”
Now let’s add SpecFlow, NUnit and Appium from the NuGet package manager. Find and install the following libraries:
- SpecFlow
- SpecFlow
- WebDriver
- NUnit
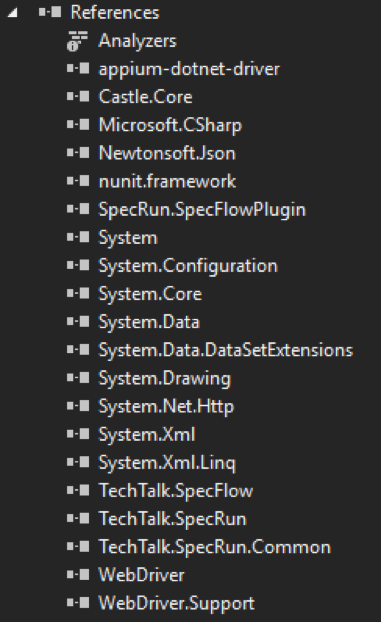
When everything is done, our references should look like this:
Project references
We also need to install the NUnit Test Adapter and SpecFlow for Visual Studio extensions. They can be found in Tools -> Extensions and Updates -> Online -> Search for “SpecFlow for Visual Studio” and “NUnit Test Adapter.” After the extensions are installed, please restart your IDE.
Next, we have to edit our App.config. Open it and add the following app settings:
<appSettings>
    <add key="deviceName" value="emulator-5554" />
    <add key="platformName" value="Android" />
    <add key="appPackage" value="com.google.android.youtube" />
    <add key="appActivity" value="com.google.android.youtube.HomeActivity" />
    <add key="appiumServerUrl" value="http://127.0.0.1:4723/wd/hub" />
    <add key="timeOut" value="10" />
  </appSettings>
- deviceName – name of the device on which the tests will be running
- platformName – name of the platform (Android, iOS, etc.)
- appPackage – package name of the application being tested
- appActivity – defines the activity to be executed from the app package
- appiumServerUrl – Appium server URL
- timeOut – global timeout for different testing purposes (for example, waiting for an element to be visible on the screen)
Your values may differ. In my case, I’m going to run tests on an emulator with the name “emulator-5554” for a YouTube application starting on “HomeActivity,” and my Appium server is set to a local machine.
Now, open the file Default.srprofile (added after the SpecFlow package installation). Edit the “Execution” element. It should look like this:
<Execution stopAfterFailures="0" testThreadCount="1" testSchedulingMode="Sequential" retryCount="0"/>
Basically, with this setup all the tests will be executed sequentially in a single thread without any retries after failures.
Now, let’s add the folder “Environment” and a class Config.cs with the following code:
using System;
using System.Configuration;

namespace Mobile.UI.Tests.Environment
{
    class Config
    {
        public static string DeviceName
            => ConfigurationManager.AppSettings["deviceName"];
        public static string PlatformName
            => ConfigurationManager.AppSettings["platformName"];
        public static string AppPackage
            => ConfigurationManager.AppSettings["appPackage"];
        public static string AppActivity
            => ConfigurationManager.AppSettings["appActivity"];
        public static int TimeOut
            => Convert.ToInt32(ConfigurationManager.AppSettings["timeOut"]);
        public static string AppiumServerUrl
            => ConfigurationManager.AppSettings["appiumServerUrl"];
    }
}
It’s necessary to access settings in App.config.
As the next step, add a new folder called “Appium.” Inside that folder, add another folder called “Drivers.” Then create a C# class called AndroidDriverProvider. This class sets up and returns the driver for interacting with the UI of our Android application.
using System;
using System.Configuration;

namespace Mobile.UI.Tests.Environment
{
    class Config
    {
        public static string DeviceName
            => ConfigurationManager.AppSettings["deviceName"];
        public static string PlatformName
            => ConfigurationManager.AppSettings["platformName"];
        public static string AppPackage
            => ConfigurationManager.AppSettings["appPackage"];
        public static string AppActivity
            => ConfigurationManager.AppSettings["appActivity"];
        public static int TimeOut
            => Convert.ToInt32(ConfigurationManager.AppSettings["timeOut"]);
        public static string AppiumServerUrl
            => ConfigurationManager.AppSettings["appiumServerUrl"];
    }
}
In this class, we are creating an instance of an Android driver with the settings mentioned in App.config.
Now, let’s create a driver wrapper class. Name it “MobileApplication” and add it to the Appium folder.
using System;
using Mobile.UI.Tests.Appium.Drivers;
using Mobile.UI.Tests.Environment;
using OpenQA.Selenium;
using OpenQA.Selenium.Support.UI;

namespace Mobile.UI.Tests.Appium
{
    class MobileApplication
    {
        public IWebDriver Driver { get; private set; }

        public void StartSession()
        {
            Driver = AndroidDriverProvider.AndroidDriver;
        }

        public void EndSession()
        {
            Driver.Quit();
        }

        public bool IsShownWithinTimeout(By locator)
        {
            try
            {
                WaitUntil(ExpectedConditions.ElementIsVisible(locator));
                return true;
            }
            catch (ElementNotVisibleException)
            {
                return false;
            }
        }

        public void Click(By locator)
        {
            WaitUntil(ExpectedConditions.ElementToBeClickable(locator));
            FindElement(locator).Click();
        }

        public void SendEnterKey(By locator)
        {
            TypeText(locator, Keys.Enter);
        }

        public void TypeText(By locator, string text)
        {
            if (string.IsNullOrEmpty(text))
            {
                return;
            }

            WaitUntil(ExpectedConditions.ElementIsVisible(locator));
            FindElement(locator).SendKeys(text);
        }

        public IWebElement FindElement(By locator)
        {
            WaitUntil(ExpectedConditions.ElementExists(locator));
            return Driver.FindElement(locator);
        }

        public void WaitUntil(Func<IWebDriver, object> until)
        {
            WaitUntil(until, Config.TimeOut);
        }

        public void WaitUntil(Func<IWebDriver, object> until, int seconds)
        {
            var wait = new WebDriverWait(Driver, TimeSpan.FromSeconds(seconds));
            wait.Until(until);
        }
    }
}
The MobileApplication class contains our driver and some UI interaction methods that wrap default driver functions like clicking buttons, typing text, waiting for element state, etc. Most of these methods use waiters. This is very useful because UI elements often appear after some delay. Lots of automation engineers are using Thread.Sleep() for these cases, which is a bad practice. Waiters are a good solution for that. They will wait for an element state and throw an exception if the state is not set after a given timeout. For a timeout, I prefer a global config value (“timeOut” in App.config) instead of having multiple constants. That makes the code easier to maintain.
All preparations are done; now we can create tests.
Creating a test scenario
Let’s add a test scenario. For that, we need to create a folder called “Features.” Right-click it and select Add -> New Item -> Visual C# Items -> SpecFlow Feature File. Type “Demo” as the feature file name and save it.
* If SpecFlow templates can’t be found in the “New Item” window, please make sure you have installed the SpecFlow plugin for Visual Studio. Above there is a description of how to install the necessary Visual Studio extension.
After the feature is added, we can add our scenario:
Feature: Demo feature

@DiatomYoutube @Pepper
Scenario: user can find and watch video
 Given user opens youtube app
 When user searches for 'Robot Pepper Intern. Episode 01. Arrival.'
  And opens first video
 Then video about robot Pepper is shown
In my scenarios, I try to avoid mentioning UI elements and instead describe them in terms of business logic. When you write something like “Select item from the dropdown,” there is a big possibility that the UI will be changed and the dropdown could be replaced with another control. In that case, you will have to rewrite your scenarios. Business logic changes less often. If the scenario describes business logic and the UI changes, there is no need to rewrite it – you’ll only have to change the code.
Writing code for scenarios
Let’s make our scenario executable.
To do this, we need to create classes that will represent the screens (pages) of the application being tested. First, we create a base class from which we will inherit the rest.
Add a “Screens” folder and create a class with the name “BaseScreen.”
using Mobile.UI.Tests.Appium;

namespace Mobile.UI.Tests.Screens
{
    class BaseScreen
    {
        public static MobileApplication App;

        public static void InitializeSession()
        {
            App = new MobileApplication();
            App.StartSession();
        }

        public static void DeleteSession()
        {
            App.EndSession();
        }
    }
}
As you can see, the BaseScreen class has a property App of type MobileApplication, which is a reference to our driver wrapper object (it contains methods for interacting with the UI). Method InitializeSession()creates an instance of AndroidDriver. DeleteSession() closes the Appium session.
Before we proceed with page classes, let’s check the workflow we are going to test.
As I mentioned before, we are going to test a YouTube application. The following actions must be performed:
- Open the YouTube application.
- Click on the search icon in the top right corner.
- On the new screen in the search text box, type: “Robot Pepper Intern. Episode 01. Arrival.”
- Click on the top video.
- Check the video player is shown.
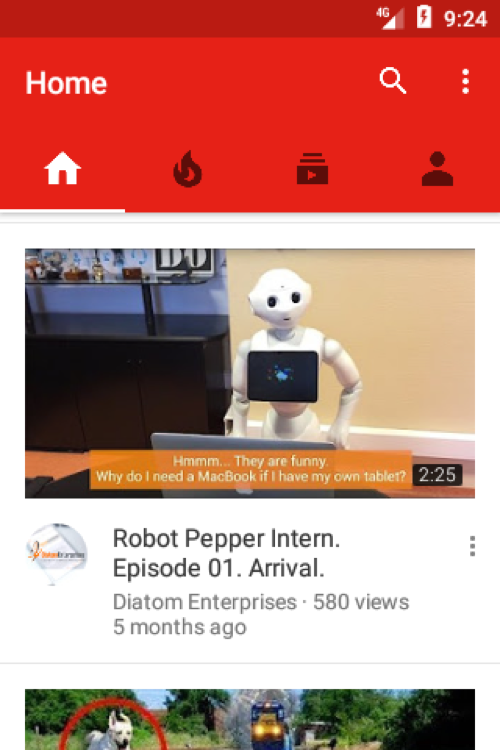
Home screen with search icon in top right corner
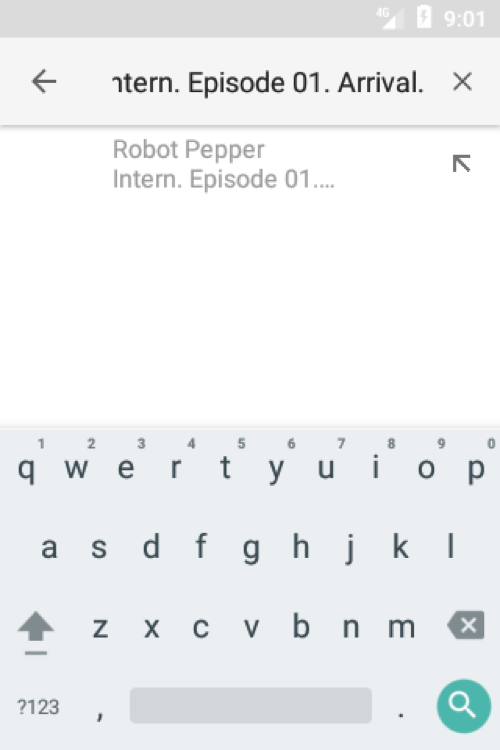
Screen with a search text box

Search result screen
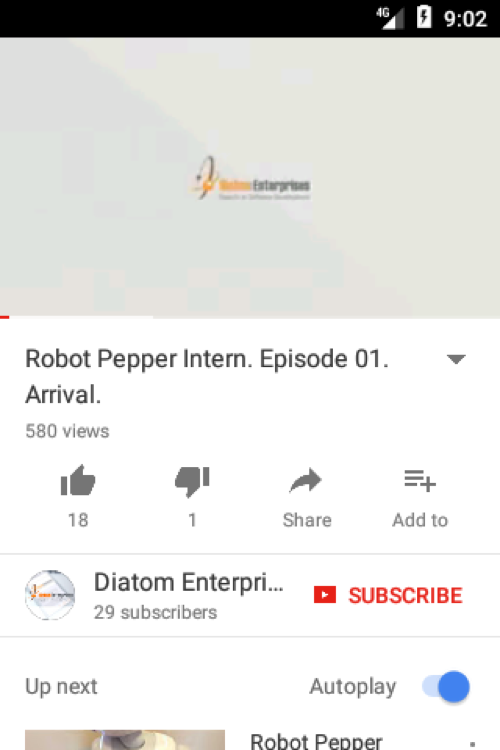
Video player screen
So, we have four screens to interact with. Let’s start with the home screen.
Create a “HomeScreen” class.
using OpenQA.Selenium;

namespace Mobile.UI.Tests.Screens
{
    class HomeScreen : BaseScreen
    {
        private static readonly By SearchIcon = By.Id("Search");

        public static void ClickSearchIcon()
        {
            App.Click(SearchIcon);
        }
    }
}
This class inherits from BaseScreen, so it can use methods from MobileApplication to interact with the UI. Here we have a static, read-only property SearchIcon, which locates the search icon in the tested application. To click on that icon, there is the method ClickSearchIcon().
Next is the search screen.
using OpenQA.Selenium;

namespace Mobile.UI.Tests.Screens
{
    class SearchScreen : BaseScreen
    {
        private static readonly By SearchBox =
            By.Id("com.google.android.youtube:id/search_edit_text");

        public static void TypeInSearchBox(string search)
        {
            App.TypeText(SearchBox, $"{search}\n");
        }
    }
}
SearchScreen contains a property representing the locator for a search text box and a TypeInSearchBox() method for inputting search text.
As the representation of a third screen, add a class with the name “SearchResultScreen.”
using OpenQA.Selenium;

namespace Mobile.UI.Tests.Screens
{
    class SearchResultScreen : BaseScreen
    {
        private static readonly By VideoImage =
            By.Id("com.google.android.youtube:id/thumbnail");

        public static void ClickOnVideo()
        {
            App.Click(VideoImage);
        }
    }
}
Here we have a locator for our top video container element and a ClickOnVideo() method, which opens the first video on the search result screen.
Finally, the last screen with a video player.
using OpenQA.Selenium;

namespace Mobile.UI.Tests.Screens
{
    class VideoScreen : BaseScreen
    {
        private static readonly By VideoPlayer =
            By.Id("com.google.android.youtube:id/watch_player");

        public static bool IsPlayerShown()
        {
            return App.IsShownWithinTimeout(VideoPlayer);
        }
    }
}
Like all the previous page classes, VideoScreen inherits from the BaseScreen. It also has an IsPlayerShown() method, which returns true if the video player is shown and false if not.
Our page classes are now implemented. Now we can add a “StepsDefinition” class to bind with our demo feature.
Create a “Steps” folder. Add a new item with the type “SpecFlow Step Definition” and name it “StepsDefinition.” Visual Studio will create a C# class with some binding for features. Let’s implement code for our given/when/then steps from the feature file.
Given user opens the YouTube app – in this step we are going to create our web driver and open the YouTube application.
[Given(@"user opens youtube app")]
public void GivenUserOpensYoutubeApp()
{
BaseScreen.InitializeSession();
}
When a user searches for ‘Robot Pepper Intern. Episode 01. Arrival.‘ – click on the search icon and type the video name in the search input.
[When(@"user searches for '(.*)'")]
public void WhenUserSearchesFor(string videoName)
{
HomeScreen.ClickSearchIcon();
SearchScreen.TypeInSearchBox(videoName);
}
And opens the first video – click on the top video image.
[When(@"opens first video")]
public void WhenOpensFirstVideo()
{
SearchResultScreen.ClickOnVideo();
}
Then video about robot Pepper is shown – check that the video player is shown. It uses NUnit assertions.
[Then(@"video about robot Pepper is shown")]
public void ThenVideoAboutRobotPepperIsShown()
{
Assert.IsTrue(VideoScreen.IsPlayerShown());
}
Finally, we need to add a “hooks” class with functionality for closing the Appium session. The SpecFlow AfterScenario attribute can be used for that.
using Mobile.UI.Tests.Screens;
using TechTalk.SpecFlow;

namespace Mobile.UI.Tests.Steps
{
    [Binding]
    public sealed class Hooks
    {
        [AfterScenario]
        public void AfterScenario()
        {
            BaseScreen.DeleteSession();
        }
    }
}
To run the tests, an Android emulator or real device is required with the YouTube application installed. In Visual Studio, go to Test -> Windows -> Test Explorer. Find a test in the opened window and run it. If everything is alright, then it should open the YouTube app on the emulator or your device, execute the tests and show the result. The test must be successful.
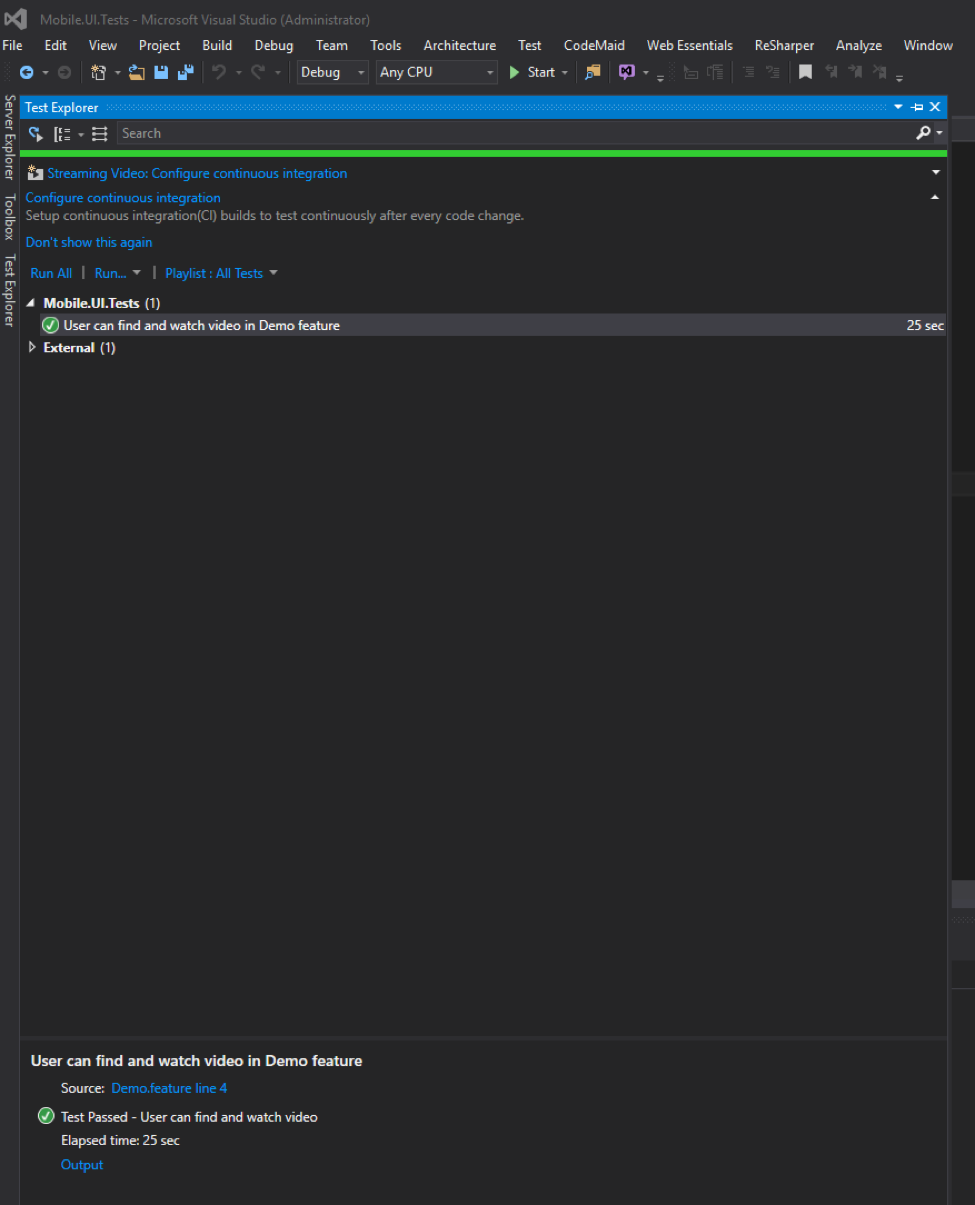
Test result in Visual Studio
Conclusion
In this article, we have implemented a very basic project for automating tests. It can be set to run tests in your CI or on the QAs’/developers’ machines as often as you need and for as many tests as you can develop. The results of the automated tests can help to monitor your mobile application’s stability and quality. QAs and developers can receive tests results, analyze them and work together to fix defects and make your application more stable.
