Regardless of your experience in Java, you have certainly heard about building applications. Even if your single Java code consists of just one class declaration with System.out.println (“Hello World!”) in the main method it has to be built. You are going to compile the class and make an executable jar to show your friend the magic of HelloWorldApp, aren’t you? After a few days of practising Java, you will want to add some dependencies and unit tests and you’ll meet a build process again and again. Most likely you will notice that in many cases you have to do the same magic with your source code every time you want to run it: add dependencies, compile, test, package, deploy… and the cycle is growing. And here the build automation tools come to do the trick.
In this article, we’ll set up a local deployment of a small web application in Eclipse Mars IDE without build automation and then improve dependency management by integrating several tools. The article will be interesting for Java developers with any level of expertise.
Setting up HelloWorld web app
In this part, we’ll implement a HelloWorld web application based on Spring MVC.
All samples given below are designed to be implemented in Eclipse Mars IDE with embedded Tomcat Server. If you want to set up a similar project by yourself, make sure that your environment allows you to make a web application project to be run on Tomcat Server.
- Why use Spring MVC?
- Spring MVC is a very popular and effective java framework providing hooks for extension and customization for web applications. Our tiny web application could be implemented using just one servlet but we use Spring to imitate a fast growing project with a set of external libraries.
Open Eclipse and create a new Dynamic Web Project calling “hello-web app”. Specify Tomcat Server as target runtime.
Eclipse should create a similar directory tree including referenced libraries such as JRE and Apache Tomcat libraries:
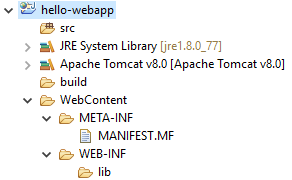
Now, let’s add Spring MVC libraries.
We’ll manage dependencies manually first time just for demonstration purposes.
The set of libraries could vary depending on Spring technologies java developers are using in the application. We’ll use a “starter” set required for routing requests and rendering JSP views:
- Spring Core
- Spring AOP
- Spring Beans
- Spring Context
- Spring Expression
- Spring Web
- Spring Web MVC
- Java Servlet API
- Commons Logging
Ok, now we have to open Google and search for these jars as well as download them and store in WEB-INF/lib directory. Since the Spring Framework team frequently publishes updates of most of the libraries we should use the constant stable version of all Spring libraries. We decided to use 4.2.4.RELEASE.
mvnrepository.com is a good choice for downloading jars.
After downloading Spring libraries our directory tree should look similar to this:
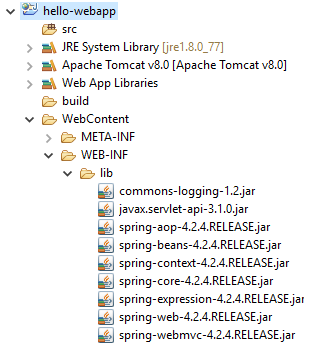
As you can see, Eclipse automatically created Web App Libraries reference, so, now we could import Spring classes in our own libraries.
Let’s create hello.web package and a simple Controller inside:
package hello.web;

import org.springframework.stereotype.Controller;
import org.springframework.ui.ModelMap;
import org.springframework.web.bind.annotation.RequestMapping;
import org.springframework.web.bind.annotation.RequestMethod;

@Controller
@RequestMapping("/")
public class HelloController {

   @RequestMapping(method = RequestMethod.GET)
   public String printHello(ModelMap model) {
      model.addAttribute("message", "Hello, world!");
      return "hello";
   }

}
Now, let’s create a simple JSP page. We’ll hold views in WEB-INF/jsp directory, so we’ll make the folder first.
hello.jsp:
<%@ page contentType="text/html; charset=UTF-8" %>
<html>
<head>
<title>Hello World</title>
</head>
<body>
<h2>${message}</h2>
</body>
</html>
Finally, let’s configure Spring so it could create our HelloController in the application context and link view resolver to JSP files. We’ll use hello.web.conf package for that.
WebConfig.java:
package hello.web.conf;

import org.springframework.context.annotation.Bean;
import org.springframework.context.annotation.ComponentScan;
import org.springframework.context.annotation.Configuration;
import org.springframework.web.servlet.config.annotation.EnableWebMvc;
import org.springframework.web.servlet.config.annotation.WebMvcConfigurerAdapter;
import org.springframework.web.servlet.view.InternalResourceViewResolver;

@Configuration
@EnableWebMvc
@ComponentScan({"hello.web"})
public class WebConfig extends WebMvcConfigurerAdapter {

    @Bean
    public InternalResourceViewResolver setupViewResolver() {
        InternalResourceViewResolver resolver = new InternalResourceViewResolver();
        resolver.setPrefix("/WEB-INF/jsp/");
        resolver.setSuffix(".jsp");

        return resolver;
    }

}
AppInit.java:
package hello.web.conf;

import org.springframework.web.servlet.support.AbstractAnnotationConfigDispatcherServletInitializer;

public class AppInit extends AbstractAnnotationConfigDispatcherServletInitializer {

    @Override
    protected Class<?>[] getRootConfigClasses() {
        return null;
    }

    @Override
    protected Class<?>[] getServletConfigClasses() {
        return new Class<?>[]{
                WebConfig.class
        };
    }

    @Override
    protected String[] getServletMappings() {
        return new String[]{"/"};
    }

}
Now we are ready to run the application.
Right click on the project name / Run as / Run on Server. Select predefined Tomcat Server instance and click OK. After deploying Eclipse an embedded browser might start and open the home page based on the context. You can open the same address in an external browser.
The webpage should look similar to this:

Whoa, it works!
Now, let’s think about the growth of our project. Since many developers provide reusable Java components you certainly want to add a set of new libraries to the project. Regardless whether they belong to Spring Framework, Apache Commons or Hamcrest you have to download them and add to WEB-INF/lib directory.
Have you enjoyed googling for the jars and downloading them manually? Let’s see how build automation tools do the trick.
Adding Ant & Ivy
Apache Ant is a classical build automation tool for Java. It was released in 2000 and uses XML format for describing the build process. Because of spaghetti structure of long multi-conditional parts, the build script written for Ant is sometimes called Anthell.
Nevertheless, Apache Ant is quite suitable for small projects. It is usually used in combination with XML-based dependency manager calling Apache Ivy. Let’s see how they work together.
First of all, let’s add IvyDE plugin for Eclipse. Go to https://marketplace.eclipse.org/content/apache-ivyde%E2%84%A2 and Drag’n’Drop the Install button to Eclipse work-space.
After the confirmation window is opened install the selected features.
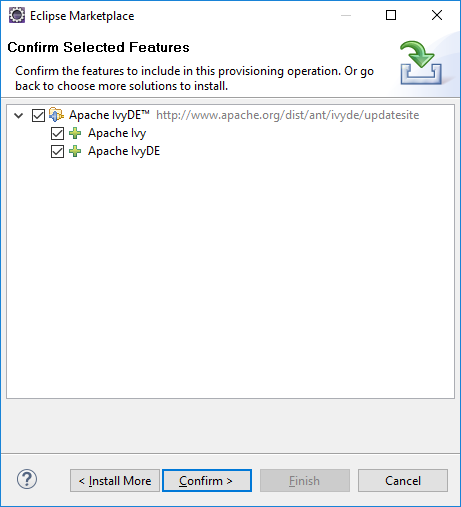
And now we are ready to create rules for dependency management. Create ivy.xml in the root directory of the project:
<?xml version="1.0" encoding="UTF-8"?>
<ivy-module version="2.0">
<info organisation="hello.web" module="hello-webapp"/>

<configurations>
        <conf name="compile" description="compile dependencies"/>
        <conf name="runtime" description="runtime dependencies" extends="compile"/>
        <conf name="test"    description="test dependencies" extends="runtime"/>
    </configurations>

<dependencies>
<dependency org="org.springframework" name="spring-core" rev="4.2.4.RELEASE" conf="compile->default"/>
<dependency org="org.springframework" name="spring-aop" rev="4.2.4.RELEASE" conf="compile->default"/>
<dependency org="org.springframework" name="spring-beans" rev="4.2.4.RELEASE" conf="compile->default"/>
<dependency org="org.springframework" name="spring-context" rev="4.2.4.RELEASE" conf="compile->default"/>
<dependency org="org.springframework" name="spring-expression" rev="4.2.4.RELEASE" conf="compile->default"/>
<dependency org="org.springframework" name="spring-web" rev="4.2.4.RELEASE" conf="compile->default"/>
<dependency org="org.springframework" name="spring-webmvc" rev="4.2.4.RELEASE" conf="compile->default"/>
<dependency org="javax.servlet" name="javax.servlet-api" rev="3.1.0" conf="compile->default"/>
<dependency org="commons-logging" name="commons-logging" rev="1.2" conf="compile->default"/>
</dependencies>
</ivy-module>
As you can see now we have a configurable XML file with a list of required dependencies.
Editing this file should update libraries by downloading them automatically. If it doesn’t happen, you can do the right click on ivy.xml and pick Add Ivy Library.
Pay attention to the fact that Eclipse has added Ivy libraries to the build path:
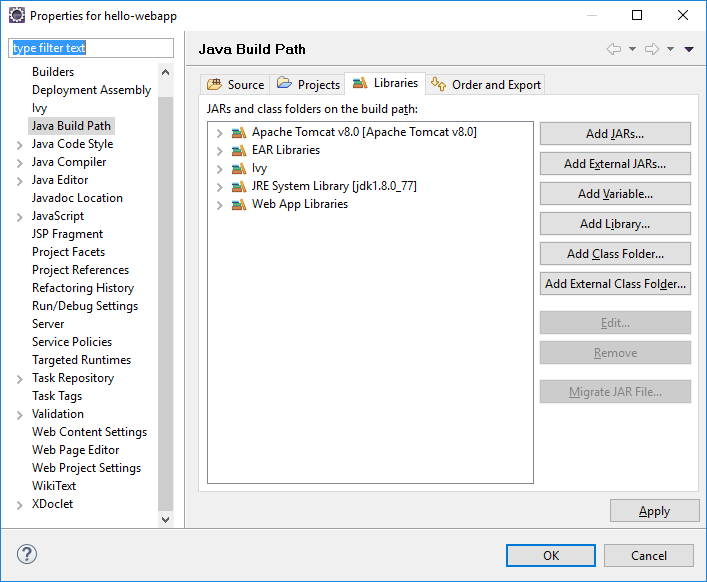
Basically, it means that you don’t have to maintain your WEB-INF/lib directory more but just manage your ivy.xml file.
Nevertheless, you might want to locate the downloaded dependencies in WEB-INF/lib directory before packaging WAR file. And here the Ant script does the trick.
Create the following build.xml file in the root directory of the project:
<!DOCTYPE project>
<project xmlns:ivy="antlib:org.apache.ivy.ant" name="hello-webapp" default="resolve">

<target name="bootstrap" description="Install ivy jar">
    <mkdir dir="${user.home}/.ant/lib"/>
    <get dest="${user.home}/.ant/lib/ivy.jar" src="http://search.maven.org/remotecontent?filepath=org/apache/ivy/ivy/2.2.0/ivy-2.2.0.jar"/>
</target>

    <target name="resolve" description="Retrieve dependencies with ivy">
        <ivy:retrieve conf="compile" pattern="WebContent/WEB-INF/lib/[artifact]-[revision].[ext]"/>
        <ivy:retrieve conf="runtime" pattern="WebContent/WEB-INF/lib/[artifact]-[revision].[ext]"/>
        <ivy:retrieve conf="test" pattern="WebContent/WEB-INF/lib/[artifact]-[revision].[ext]"/>
    </target>

    <target name="clean" description="Remove build directories">
        <delete dir="lib"/>
    </target>

    <target name="clean-all" depends="clean" description="clean ivy cache">
        <ivy:cleancache />
    </target>

</project>
Now you are free to run four tasks using Ant (the Ant task is called target):
- bootstrap
- resolve
- clean
- clean-all
The task bootstrap is needed only for the first time. It tells Ant to download ivy.jar for doing the job.
Right click on build.xml / Run As / External Tools Configuration / Targets and pick bootstrap and resolve. You will see that all dependencies will be stored in WEB-INF/lib directory.
We have tried to use Ant & Ivy to manage dependencies automatically. It’s a good improvement but now let’s see how it could be done faster.
Adding Maven
Apache Maven is another build automation tool for Java projects released in 2004. Maven addresses two aspects of building software: first, it describes how software is built, and second, it describes its dependencies.
Let’s see how it works.
Right click on the project name / Configure / Convert to Maven Project. Leave all fields as they are suggested.
Now you should see pom.xml is created in the root directory of the project:
<?xml version="1.0" encoding="UTF-8"?>
<project xmlns="http://maven.apache.org/POM/4.0.0" xmlns:xsi="http://www.w3.org/2001/XMLSchema-instance" xsi:schemaLocation="http://maven.apache.org/POM/4.0.0 http://maven.apache.org/xsd/maven-4.0.0.xsd">
   <modelVersion>4.0.0</modelVersion>
   <groupId>hello-webapp</groupId>
   <artifactId>hello-webapp</artifactId>
   <version>0.0.1-SNAPSHOT</version>
   <packaging>war</packaging>
   <build>
      <sourceDirectory>src</sourceDirectory>
      <plugins>
         <plugin>
            <artifactId>maven-compiler-plugin</artifactId>
            <version>3.3</version>
            <configuration>
               <source>1.8</source>
               <target>1.8</target>
            </configuration>
         </plugin>
         <plugin>
            <artifactId>maven-war-plugin</artifactId>
            <version>2.6</version>
            <configuration>
               <warSourceDirectory>WebContent</warSourceDirectory>
               <failOnMissingWebXml>false</failOnMissingWebXml>
            </configuration>
         </plugin>
      </plugins>
   </build>
</project>
As you can see, pom.xml file is quite easy to understand. We declared some variables of the total artefact in the beginning and then added directives for two plugins required for a proper compilation and packaging.
Now we want to add the required libraries. As it has been already told, Maven describes dependencies as well as a building process. You can guess that dependencies are being described right there in pom.xml and you’re right!
Just add dependencies section. We use org.springframework.version property for more comfortable usage:
<?xml version="1.0" encoding="UTF-8"?>
<project xmlns="http://maven.apache.org/POM/4.0.0" xmlns:xsi="http://www.w3.org/2001/XMLSchema-instance" xsi:schemaLocation="http://maven.apache.org/POM/4.0.0 http://maven.apache.org/xsd/maven-4.0.0.xsd">
   <modelVersion>4.0.0</modelVersion>
   <groupId>hello-webapp</groupId>
   <artifactId>hello-webapp</artifactId>
   <version>0.0.1-SNAPSHOT</version>
   <packaging>war</packaging>
   <properties>
      <org.springframework.version>4.1.6.RELEASE</org.springframework.version>
   </properties>
   <dependencies>
      <dependency>
         <groupId>org.springframework</groupId>
         <artifactId>spring-core</artifactId>
         <version>${org.springframework.version}</version>
      </dependency>
      <dependency>
         <groupId>org.springframework</groupId>
         <artifactId>spring-aop</artifactId>
         <version>${org.springframework.version}</version>
      </dependency>
      <dependency>
         <groupId>org.springframework</groupId>
         <artifactId>spring-beans</artifactId>
         <version>${org.springframework.version}</version>
      </dependency>
      <dependency>
         <groupId>org.springframework</groupId>
         <artifactId>spring-context</artifactId>
         <version>${org.springframework.version}</version>
      </dependency>
      <dependency>
         <groupId>org.springframework</groupId>
         <artifactId>spring-expression</artifactId>
         <version>${org.springframework.version}</version>
      </dependency>
      <dependency>
         <groupId>org.springframework</groupId>
         <artifactId>spring-web</artifactId>
         <version>${org.springframework.version}</version>
      </dependency>
      <dependency>
         <groupId>org.springframework</groupId>
         <artifactId>spring-webmvc</artifactId>
         <version>${org.springframework.version}</version>
      </dependency>
      <dependency>
         <groupId>javax.servlet</groupId>
         <artifactId>javax.servlet-api</artifactId>
         <version>3.1.0</version>
      </dependency>
      <dependency>
         <groupId>commons-logging</groupId>
         <artifactId>commons-logging</artifactId>
         <version>1.2</version>
      </dependency>
   </dependencies>
   <build>
      <sourceDirectory>src</sourceDirectory>
      <plugins>
         <plugin>
            <artifactId>maven-compiler-plugin</artifactId>
            <version>3.3</version>
            <configuration>
               <source>1.8</source>
               <target>1.8</target>
            </configuration>
         </plugin>
         <plugin>
            <artifactId>maven-war-plugin</artifactId>
            <version>2.6</version>
            <configuration>
               <warSourceDirectory>WebContent</warSourceDirectory>
               <failOnMissingWebXml>false</failOnMissingWebXml>
            </configuration>
         </plugin>
      </plugins>
   </build>
</project>
Editing pom.xml will automatically download all required dependencies.
Notice how Eclipse changed the build path:
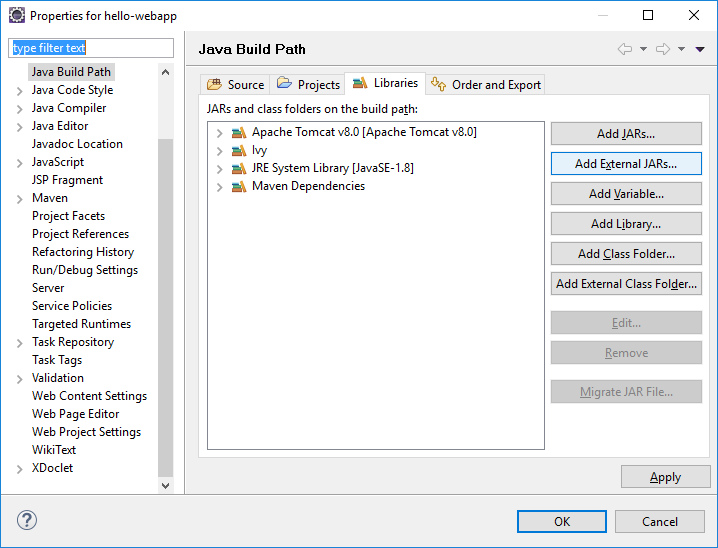
Combining ivy and maven dependencies is not a good idea. You are recommended to remove ivy.xml as well as Ivy libraries from the classpath.
If you want to build WAR file just do the Right click on the project name / Run As / Maven install. Maven will locate all libraries in WEB-INF/lib directory automatically.
We have migrated to Maven and saw that it is more simple and straightforward then Ant & Ivy. Now, let’s see how Gradle manages dependencies.
Adding Gradle
Gradle is the most modern build automation system for Java released in 2007. It follows concepts of Ant and Maven but is more simple and flexible. It uses Groovy language to describe build process.
Now, we want to add Gradle to our project.
First, disable Maven. Right click on the project name / Maven / Disable Maven Nature.
Now right click on the project name / Configure / Convert to Gradle (STS) Project.
Although pom.xml still exists it is not being used any more.
At the first sight nothing has changed but the magic is done behind the scenes.
Just add simple and human readable build.gradle in the root directory of the project:
apply plugin: 'java'
apply plugin: 'war'
apply plugin: 'eclipse-wtp'

sourceCompatibility = 1.8
targetCompatibility = 1.8

repositories {
    mavenLocal()
    mavenCentral()
}

war {
    baseName = 'hello-webapp'
    version =  '0.0.1-SNAPSHOT'
}

dependencies {
    compile 'org.springframework:spring-core:4.1.6.RELEASE'
    compile 'org.springframework:spring-aop:4.1.6.RELEASE'
    compile 'org.springframework:spring-beans:4.1.6.RELEASE'
    compile 'org.springframework:spring-context:4.1.6.RELEASE'
    compile 'org.springframework:spring-expression:4.1.6.RELEASE'
    compile 'org.springframework:spring-web:4.1.6.RELEASE'
    compile 'org.springframework:spring-webmvc:4.1.6.RELEASE'
    compile 'javax.servlet:javax.servlet-api:3.1.0'
    compile 'commons-logging:commons-logging:1.2'
}
To update dependencies just do the right click on the project name / Gradle (STS) / Refresh Dependencies.
The buildpath has also been changed:
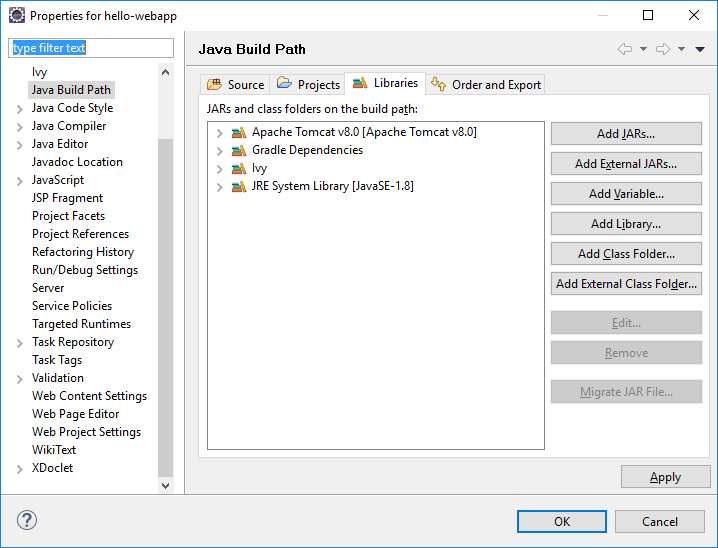
To package WAR file do the right click on the project name / Gradle (STS) / Tasks Quick Launcher. Enter war and press Enter. The WAR file will appear in build/lib directory. You can find all dependencies in WEB-INF/lib directory located by Gradle automatically.
And that’s it! Gradle manages our tasks in a very simple and obvious way.
Conclusion
During the article, we have set up a tiny web application based on Spring MVC. First, we tried to add libraries manually and then used three systems for dependency management. The difference of configuring is clear by comparing years of the releases. It’s easy to guess that more modern tools are set up in a more automated way. Of course, if your developers are using other ways to manage Java applications
Of course, build system automation tools are also useful for many other tasks. You are advised to visit the official websites for more information.
