Back story
A few years ago, I started working with Node.js applications. Recently, I was assigned to an existing project. When I opened the Readme file, I found out that at least five applications had to be downloaded in order for the project to start working: Node.js, Image Magic, Gulp, Postgress, create default database and more. The installation period wasn’t short because all the team members were Linux users, and I was using macOS. You can imagine – not much compatibility here. After long and exhausting installing dev environments, etc., I saw a partial solution to some of the development problems that we could use in the future.
Enter the Docker
Docker is unique. It allows you to use publicly available system images to develop isolated application containers. And once your project is done, your code, database, whatever can be deployed to some web instance(s) and run without any change in the deployment environment system.
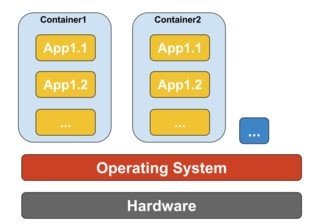
It is hard to explain what Docker does without hundreds of graphs and fancy images, but in short, a Docker container will run like a virtual machine on your host environment (Windows, Linux, macOS) but with almost native speed.

Docker containers running on single host machine
Unlike a virtual machine, a container does not need to boot the operating system kernel, so containers can be created in less than a second. This feature makes container-based virtualization unique and more desirable than other virtualization approaches. Since container-based virtualization adds little or no overhead to the host machine, container-based virtualization has near-native performance. Docker is just a fancy way to run a process, not a virtual machine.
Test application story
I needed to create a test for a node application a while ago, with React.js for the frontend and MongoDB to store some basic data on the backend. Since I had some experience with Docker containerization from the Cliizii project, I decided to use it to build my development environment.
To see all the project scripts and configurations, refer to github.

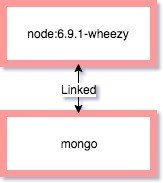
We will assemble the following Docker Image structure
In order to have Node.js installed on my system, I used the publicly available “node:6.9.1-wheezy” image. It is basically Ubuntu with Node.js installed on it. I used a separate Mongo image to store my persistent data. On Node “container” I also installed Webpack to compile my JavaScript code and minify CSS.
Here is a configuration file for the Nodes container:
——————Dockerfile—————–
FROM node:6.9.1-wheezy
# Create app directory
RUN mkdir -p /usr/src/app
WORKDIR /usr/src/app

# Install app dependencies
COPY package.json /usr/src/app/
RUN npm install
RUN npm install -g nodemon
RUN npm install webpack -g
RUN npm install --save extract-text-webpack-plugin

# Bundle app source

#COPY . /usr/src/app
ADD . /usr/src/app

#RUN webpack --watch --watch-polling
RUN webpack

# Expose the port used by Node.js
EXPOSE 8085

# start the app
CMD ["node", "--debug", "/usr/src/app"]
—————————————-
What this does is:
1) fetch node:6.9.1-wheezy base image;
2) set the folder where our app will reside;
3) copy package.json (Node.js specific configuration file), which contains the application dependency description and install it;
4) copy application sources to Docker working director; and
5) compress frontend JavaScript with Webpack.
Then we expose our port 8085 and run Node.js server.
When you build this container in Terminal:
docker build -t diatom:node_tests .
And run it:
docker run -p 49160:8080 -d diatom:node_tests
Your server is live under localhost:8085, but the database is still not configured. To combine several Docker containers, you need to use the “yml” Docker compose configuration, which can do exactly that. Let’s take a look:
——————Docker-compose.yml file—————
version: '2'
services:
db:
image: mongo
ports:
- "27017:27017"
node_part:
build:
context: .
dockerfile: Dockerfile
image: diatom:node_tests
container_name: diatom-node-container
ports:
- "8085:8085"
volumes:
- wwwroot:/usr/src/app/wwwroot
links:
- db
volumes:
wwwroot:
driver: local
——————————————————
If you run it in terminal:
docker-compose up –build -d
it will:
1) build Dockerfile for Node project,
2) pull Mongo image from Docker repository and
3) bind Node container to run Mongo container.
What we get
We have created a Node.js environment that anybody can reuse.
If you were to try and build my project, the only dependency you would need is Docker, your favourite code editor and a git client. Then following the instructions – some three commands in Terminal (CMD) – you would have a full feature development environment on Windows, Linux or macOS. If necessary, you can even apply webpack-dev-server to Docker and see live changes of your code while you type.
Trust me, this setup was much faster to implement then if I had downloaded a newer Node.js, configured my local Mongo database server, Webpack live update feature etc. Every Docker image and container that is built is isolated, meaning that for different projects I can have different versions of Node or other important dependencies. Your core operating system is not cluttered with dependencies that you will forget to remove when the project is done. You simply remove the project-related images.
Cons
Of course, Docker is not perfect. There is quite a learning curve to pull off a decent project structure, and you have to constantly rebuild your Docker images if you have core changes in the underlying system. For example, if you decide to change the database engine from MySQL to PostgreSQL, not only will you have to rewrite some of your code, but you also have to re-implement the Docker compose scripts for all the team members to use. But again, this can be done by one developer.
Pros
When the project is in a state where you can deploy it, the existing configuration is about 95% complete to be reused for deployment to the web. Very little additional setup is necessary to configure Docker on your backend. The amount of time spent by your DevOps to configure the release platform (Amazon, Azure, etc.) will be shorter. Docker also consumes much fewer backend resources as opposed to traditional virtual machines; therefore, organizations are able to save on everything from server costs to the employees needed to maintain them. Docker allows engineering teams to be smaller and more effective. Docker manages to reduce deployment to seconds. This is due to the fact that it creates a container for every process and does not boot an OS. Data can be created and destroyed without worry that the cost to bring it up again would be too high. The “it works on my machine” excuse will be gone, as every Docker container conforms to build/development standards and runs as expected on any platform.
Conclusion
Docker is definitely a great way to think about app structure. In my opinion, it could spawn completely new products and build tools in the future such as to render farms for 3D or cross-platform development systems for building websites and apps. Any cloud computing task is possible. Docker is generally used to build agile software delivery pipelines and implemented with scaling in mind, which means you could setup clusters with multiple instances of your frontend and backend in a matter of minutes.
Later, we successfully used a Docker containerization on Cliizii, one of our recent projects. To see how all this is working in multiple instances, take a look at the sample projects in this GitHub repository. It covers all features described in this post like installing or adding Docker images, connecting Database image, making your application scale and more. Just follow instructions in Readme.md files. Feel free to share your thoughts about Docker here or connect personally!
